Are you planning to update your website, improve its graphic design, or modify its structure? Keep in mind that even these actions can significantly impact keyword positions in search results, and as a result, your organic traffic.
To execute a website migration properly, it’s crucial to have clear responsibilities assigned and a comprehensive migration checklist in place. This ensures that no important steps are overlooked, as the migration process can vary depending on the type of migration. In addition to potentially affecting keyword positions, migration can also impact paid campaigns. Therefore, collaboration and prompt information sharing are essential.
In addition to the interesting information, in the article you will also find a general checklist for website migration as well as an individual checklist for paid campaigns from Basta digital.
What is website migration?
A website migration takes place when you change the hosting, CMS (Content Management System) or domain of a website. However, it is not always the case. Sometimes a website migration can also be referred to as a graphic design change. This can include changing the structure of the website, or changing the actual web links, headings and so on.
If changes to the website’s structure are made without implementing proper redirects, the original address to which backlinks were bound will not transfer its value to the new landing page. Altering headings can also affect the keywords for which the web page appears in search results. For example, changing filtering and search may have an impact on dynamic paid campaigns. It’s important to keep in mind that everything is interrelated during a website migration. Therefore, a plan must be established in advance, specific to the type of migration.
What are the types of website migration?
In case of website migration, it can be any of the following types:
- Change of hosting,
- change of the content management system (CMS) of the website,
- change of the website domain (e.g. from .eu to .sk),
- change of HTTP protocol to HTTPS,
- change of website version (URL with www to without www, etc.),
- modifying the structure of the website,
- graphic design of the website,
- combination of the above actions.
Migration according to the size of the site
Determining the migration of a website by type is particularly important in terms of defining responsibilities:
- Corporate site migration,
- migration of an e-shop with a large number of products,
- migration of a small website or e-shop,
- other types of websites.
Allocation of responsibilities for website migration
In each step of the migration checklist, it is important to identify the person who will be responsible for a particular point. In addition to responsibilities, it is recommended to determine a timeline of activities using a Gantt chart.
The responsibilities in the migration checklist should be defined by the person who will review them once completed. The people who most often enter the website migration process are:
- Internal programmers, or external agencies and companies providing programming services,
- content specialists or website editors,
- product specialists,
- SEO specialists,
- PPC specialists,
- comparison specialists,
- analysts,
- other staff whose responsibilities need to be defined in the migration checklist.
SEO migration checklist and strategy
A migration checklist with specific responsibilities will help maintain organic traffic to the website even after the migration. It is a sort of overall strategy and process on how the migration will be carried out.
It is very important to make the checklist available to all the responsible people who are directly or indirectly involved in the website migration. A migration checklist can be particularly beneficial especially when migrating corporate and large websites. However, it will also help small websites not to forget something essential. A general migration checklist should be divided into three phases:
- Pre-migration phase,
- Migration phase,
- post-migration phase.
Pre-migration phase
- At each point, define a responsible person who will be responsible for the activity.
- Educate the website editors on the basics of SEO, or prepare a SEO manual if you will be changing the content on the website.
- Make the new website you’re developing in a dev environment available after login, or disable indexing for now (be sure to re-enable indexing after the website migration).
- Prepare a new XML sitemap.xml that contains all of the new URLs.
- If the site is an e-shop, check the functionality of the shopping process.
- Prepare a list of the original URLs from multiple sources (Screaming Frog, Search Console, Google Ads, Google Analytics, etc.). Keep this list for next check-up after the website migration.
- Set up main keywords position monitoring.
- Prepare permanent redirects from existing URLs to new URLs when they change via a 301 status code. Prepare manual redirects from the list you have created – you can automate product redirects (TIP: In addition to URLs, consider redirecting images that will be at a different URL and have backlinks linking to them).
- Explain the main domain version ( then HTTPS protocol + real domain version without www, if we assume a post-update from using www subdomains ).
- Prepare a custom 404 error page with a unique title (Title) to easily filter out later visits ending on a non-existent page.
- Find out in Google Analytics what content (articles, blog, products, etc.) is bringing you the most traffic from organic search. Copy this content into your new CMS. Any change of important content in the structure will almost certainly result in a loss of organic traffic.
- (Optional) Prepare a temporary site unavailability notice page with contact information to which you will temporarily direct visitors during the site change (status code 302). This point is especially relevant for corporate and large websites.
- See when you have the fewest visitors on the site – you can find this in Google Analytics (Audience > Overview by day and hour, for e-shops also E-commerce > Sales, day of the week and hour of the day).
- Prepare a proposal for migration, or keep the text in the Title and META description tags.
- Check the speed of the upcoming website and optimize according to Google PageSpeed Insights.
- Incorporate relevant structured data or remove other technical deficiencies that the original website had.
- Make a complete backup of the old website (web generating code, HTML, CSS, JS, database, etc.) and set it aside in case of a failed migration. Also prepare a backup of the feeds (comparisons, etc.).
- Check the analytics of the upcoming website before launching it. By checking the analytics and the necessary codes, you can prevent the loss of data that is crucial after the migration.

Example of redirects in Htaccess form
Migration phase
- Notify the PPC specialist to temporarily pause the campaigns and then follow the PPC checklist.
- Turn on the temporary page and direct all traffic to it (redirect via status code 302).
- Shut down the old site and upload the code for the new site.
- Enable indexing (remove noindex instructions if they were used in the dev version of the website) and upload the new robots.txt and sitemap.xml files.
- Immediately after the migration, check the functionality of the redirects from the created list and manually check the functionality of the website.
Post-migration phase
- Test basic functionality like viewing multiple pages, submitting forms or placing an order.
- Test the website with the Screaming Frog web tool (enter its main URL and let it run). This will reveal non-redirected 404 error pages (e.g. in the content) and identify other potential problems.
- Set up a site migration in Google Search Console if the domain has changed (not valid for www or HTTPS domain versions, for example).
- Check feed functionality (if the URL has changed, change it in the necessary tools – Merchant Center, Facebook, …).
- Edit the URL in the local profile if the domain has changed.
- Submit a new sitemap.xml file to Search Console.
- After a few hours or days, check the Search Console tool for possible problems that Google has discovered (Coverage > Error).
PPC migration checklist and strategy
Even when checking paid campaigns, it’s important to follow a number of steps, in line with other departments. If you ignore any of the following activities, complications are likely to arise in the near future.
- A basic check during migration should be a measurement check. If a snippet of analytics code is missing or improperly implemented on the new site, data may be lost, making it impossible to evaluate campaigns. It happens that the data layer changes or drops out completely. This results (especially in ecommerce projects) in broken measurement of orders and their values. The original goals stop working. This also applies to event scoring in Facebook Ads.
- Ads can be rejected when the domain is changed or redirected incorrectly. The GCLID parameter is lost when the ad is clicked through and site traffic from the PPC channel drops.
- The problem can also occur with audiences. Because of subpage name changes, audiences may stop collecting users, which can result in, for example, limiting the functionality of marketing campaigns.
- It is also necessary to think about product feeds that operate with specific product links. If there is a broken product subpage in the feed, the product will be rejected and cannot be advertised on.
In order to prevent such situations, we at Basta digital have created a checklist designed for the marketer who is responsible for paid campaigns. According to the PPC migration checklist, we monitor the different parts of the campaigns and analytics. What specifically should you check?
Google Ads:
- Check the URLs of your search, content and video ads to make sure they are not rejected due to landing page malfunction.
- Check to see if ad extensions are also rejected due to landing page malfunction.
- Check the Information feeds (Business data) feeds if you are using a DSA page feed or dynamic remarketing feed. Make sure the file is updated and contains the correct feed URL. Also check the status of each product and its approval.
- Are conversions being recorded? Check the conversion measurement directly in Google Ads. If you have conversions implemented via a Google Ads code snippet, make sure the code is where it’s supposed to be.
- Last but not least, take a look at the notifications in Google Ads. You’ll find a summary of rejected ads. Also visit the Policy Manager to see all the rejected ads in your account.

Facebook:
- Check to see if any ads in your account are rejected due to landing page malfunctions.
- Visit the Resource Center, where you can find all the information about issues in the account, specifically you can find rejected ads and pixel issues.
- Check Commerce Manager, specifically what state the catalog items are in, if they are approved, and if you are using up-to-date product links. Also pay attention to the link feed, how current it is, and whether it’s updated regularly.
- Check the Pixel Code settings to make sure it is running on all pages. Also, visit Event Manager and check if Facebook events are running correctly or if they are failing.
- If you have changed the domain of the website, add domain verification to your Business Manager.


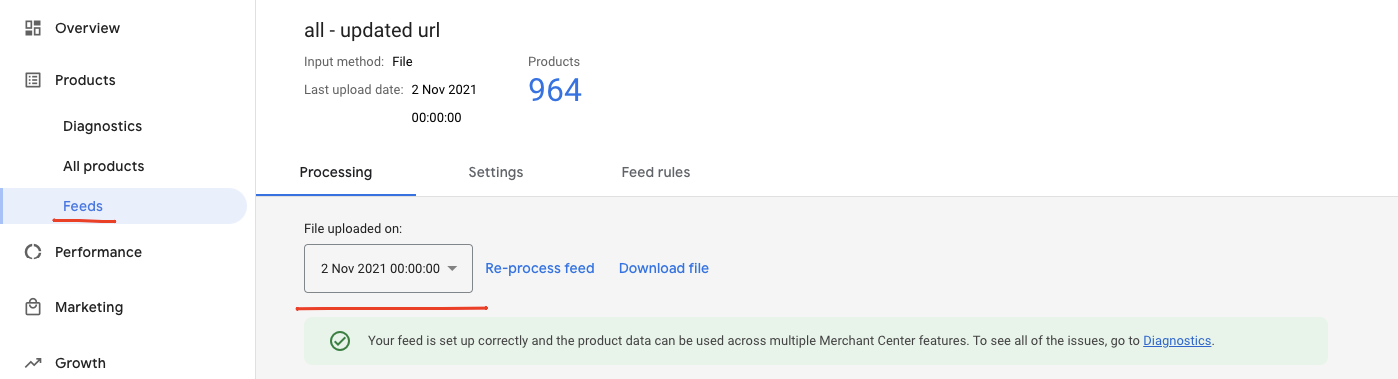
Merchant Center:
- In Merchant Center, visit the Diagnostics tab first. There you will find important information about your products. If your products contain incorrect URLs, you will find them there.
- Check the feed settings, the time of the last update and if it contains the correct feed link after migration. When the URL changes, you can manually update it using “Fetch now”.
Google Analytics:
Ensure that website traffic is being recorded in Google Analytics, and that the measurement code snippet is properly implemented on all subpages. If you’re using Google Tag Manager, check that the data layer code on the website is functioning correctly, and verify that all necessary information is being sent to the data layer.
Review your goal settings to ensure that user actions are being recorded accurately. Goals may need to be adjusted when transitioning to a new website. For Ecommerce tracking, confirm that the data layer is in compliance with the relevant specifications.
Monitor your original audience sizes. Changes to the website’s subpages or content may result in a decrease in audience numbers. Use Google Ads’ Audience Manager to track changes in your audience size over time.
Comparators and aggregators:
- Make sure to check the administration of your comparison and aggregator tools, such as Heureka, Glami, Arukereso, and Shopalike, for any error messages in the relevant feeds. Also, ensure that the feed link is up-to-date.
What else to keep in mind?
- Are the feeds in the automation tools (e.g. PPCBEE) up-to-date? Will this affect ad creation?
- Also, don’t forget to check the status of the ads and feed in other programs you work with, such as Sklik.
- And don’t forget to keep in mind other tools like Adform, Inres, Etarget, and others.
We often come across cases in which clients don’t pay attention to these things, which can lead to more serious losses. That’s why at Basta digital, we’ve created a workflow to eliminate the negative impact of migration on campaigns.
Checking campaigns using the checklist takes approximately 1 to 2 hours (depending on the number of errors and limitations). During this period, we will pause the campaigns and fix any errors. To make your work easier, we have prepared a clear checklist for you to use after the site migration.
PPC migration checklist (online)
The most common website migration mistakes
If the sequence and proper division of responsibilities is followed, there is no reason to worry about chaos and loss of traffic. However, these mistakes are often occur during a website migration:
Forgotten noindex on the live version
The new site is up and running, but organic traffic has dropped dramatically. The cause may be a forgotten no index in robots.txt, in the code or in meta robots instructions. The original pages have been redirected to pages that have been banned from indexing, and therefore gradually start to disappear in searches.
We recommend checking the indexing on a live website multiple times, as de-indexing a website can have long-term negative consequences. As with everything, the sooner the no-index is removed and the page reindexed, the less the long-term consequences will be.
Incorrect redirects and redirect chains
A very common mistake is incorrectly created manual and automated redirects. An error can be a bulk redirect using a 302 status code, which is a temporary redirect as opposed to a 301 status code. It is often used when, for example, a product is out of stock, but it is an error when migrating a website. Redirects to the wrong version of a web page can also cause harm.
For example, if redirects are created to an old version and no rule is created (for example for www), visitors will encounter a 404 code. That is, an error page that does not even transfer the value of the backlinks.
If the version was redirected, we would create a chain of redirects in which the 301 status code would go to the version with www. This would redirect the visitor a second time to the correct version of the web page.

Example of a correct 301 to 200 redirect, source: https://httpstatus.io/
Design changes
A beautiful website using a lot of javascript and minimal text. The idea of simplicity may not always have the desired effect, it may even affect keyword positions in search. A large amount of javascript can have a negative effect on the speed of a website, even more so if it is also from an external source.
In addition to the impact on user experience, website speed also has an impact on keyword positions. Less text means less information for the visitor, and therefore fewer keywords that we can naturally use in the text. When designing a website, we need to take into account the extent to which it is possible to make the page clear, but also fast and informative.
FIltering causing duplicate URLs
Changes to filtering are often dealt with, for example, when making graphical changes to a web page. This would not be a problem if they were handled correctly and only so many pages were offered to search engines that can be beneficial for the website. If multiple filtering with automated headings is enabled, but not treated with canonical or no-index tagging, it can create several hundred thousand URLs that will impact your available crawl budget. Allow indexing filters only to the extent that it makes sense.
Content creation without keyword analysis
Any content specialist can edit your content, but if you don’t create content according to keyword analysis, you may stop showing up for search terms. And conversely, show up for those synonyms that aren’t searched for at all. With any content change, it’s important to consider whether the change may have an impact on organic traffic or the company’s sales itself.
Invisible technical issues
New solutions, the latest functionality and a fast website. These are also reasons why companies are embarking on updating their websites. However, each of the new functionalities and solutions may have hidden reasons that will affect keyword positions. Therefore, it is necessary to re-create a technical audit every time a website is migrated, which can reveal barriers and reduce the risk of losing positions.
Basic data collection and which sites to migrate?
When migrating a website, basic data collection is very important. We need to use as many resources as possible during redirects so that we can capture all the pages that exist on the site. This will avoid additional increases of error pages in Search Console as well as visitors arriving on error pages.
In addition, any backlinks that a web page has will be preserved. We recommend using resources such as Screaming Frog, Google Search Console, Google Analytics and Google Ads. Then combine all the resources into one document, in which you remove duplicate URLs.
This way you will get all the pages that Google has available and also the ones that it can index until the time of migration (unless new content is created – then the list needs to be updated). The list will also help you after the website migration to see if the redirects were done correctly and without strings.
Not all pages need to be redirected. Websites that did not link to each other canonically or contained a no-index tag do not need to be redirected unless they served another purpose (e.g. in bookmarks, contained backlinks, etc.). You don’t have to redirect all images either.
We recommend redirecting those images whose URL has changed and contained backlinks. It is also advisable to upload the created list of images to Ahrefs or Marketing Miner. Those images that have backlinks will then be added to the list of URLs to be redirected.
Tools used for website migration (collection, backup, control and monitoring)
Google Search Console
Search Console is an important tool in all phases of website migration. Before migration, it serves as a source of URLs for us. Only a thousand of these can be exported directly, but by using other tools such as Supermetrics, all URLs can be retrieved. In GSC, we also add a sitemap and define the new domain to migrate to (if the domain is changing). In the last phase, we track the evolution of the errors, which we can quickly react to.

Google Ads
In the initial phase, it serves as a source of URLs. Later we follow the PPC checklist, which is available for download at the top of the article.

Screaming Frog
One of the most important tools in website migration. It is used to collect URLs, as well as important technical factors like titles, META descriptions, headings, filters, and duplicates that can affect website traffic. After the migration, it helps with a quick check of all redirects, and we can immediately determine if the page can be indexed.

Google Analytics
Analytics is the foundation of a well-functioning website, and it can also provide us with redirect URLs. After the migration, we use it to track the development of organic traffic and website turnover from different channels.

Collabim
Excellent tool for monitoring keyword positions. If the positions of the main keywords have significantly decreased or worsened just after the website migration, then the problem will probably need to be solved on a technical level.

Google PageSpeed Insights
Website speed has been a hot topic of discussion recently, as its impact on keyword positions in search has increased. Google PageSpeed Insights will provide you with specific information, opportunities, and diagnostics on the factors that affect website speed.

Examples of proper website migration
DPD website migration

The website migration for DPD was carried out at the beginning of February 2020. Prior to the migration, we collaborated with DPD’s internal programmers and manually prepared the redirects. We also made changes to the website’s structure, including editing headlines and content. The changes in structure, among other factors, had a positive impact on the organic traffic that followed after the migration.


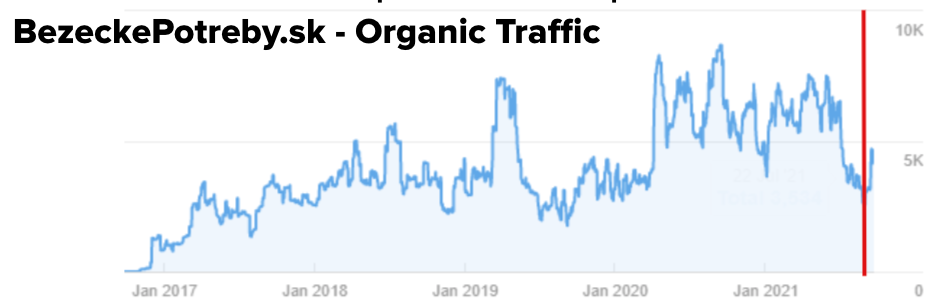
Migration of the BezeckePotreby.sk website

Prior to the migration, we began to notice a decline in important keyword positions due to slow site speed and incorrect structure, which led to cannibalization of some pages. We adjusted the structure, created indexable filters that made sense (level 1, custom title and original, unique description) and improved website speed.
After the migration, we observed an improvement in the positions of general keywords that were previously cannibalizing each other due to the incorrect structure. Additionally, we noted an overall improvement in the search keywords for which the site was ranking.

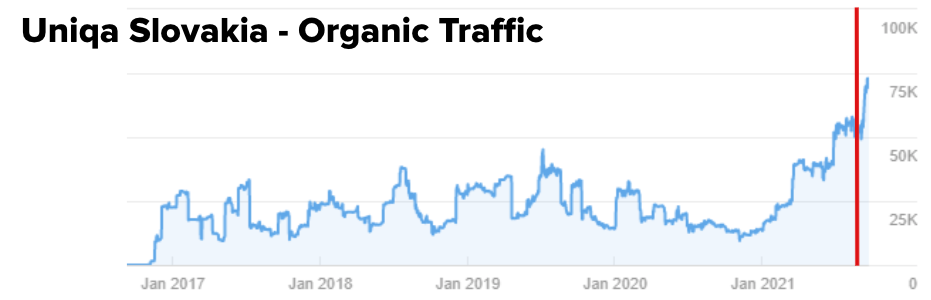
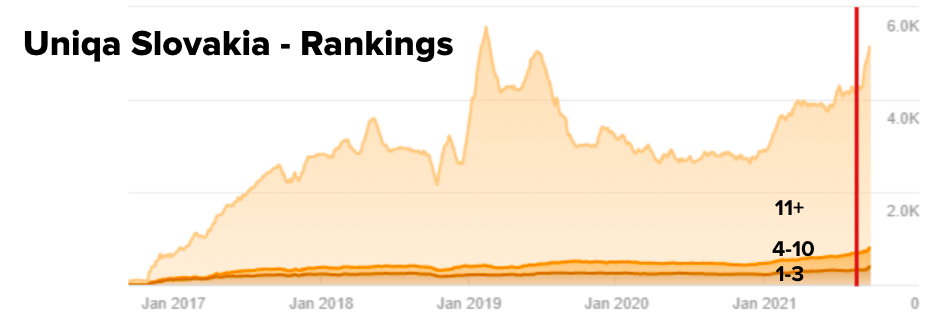
UNIQA website migration

Although some important pages were not included in the website’s new structure during the migration process, we still saw an improvement in organic traffic. This was largely due to the fact that, in addition to migrating the UNIQA website, the AXA domain was also redirected to Uniqa.sk. It was crucial to monitor not only the overall organic traffic but also the development of organic traffic for specific landing pages. By doing so, we were able to identify any potential issues and address them in a timely manner, resulting in further improvements to the website’s overall performance.